1). 安装 zookeeper 略;
2). 安装 go
# 安装依赖
yum install -y gcc glibc gcc-c++ make git autoconf automake libtool
创建目录
mkdir -p /usr/local/golang
mkdir -p /usr/local/codis
cd /usr/local/golang/
wget https://golangtc.com/static/go/1.8.4/go1.8.4.linux-amd64.tar.gz
tar xzvf go1.7.3.linux-amd64.tar.gz
ls
go  go1.7.3.linux-amd64.tar.gz
...
配置/root/.bash_profile
...
export GOROOT=/usr/local/golang/go
export GOPATH=/usr/local/codis
export PATH=$GOROOT/bin:$PATH
path=$PATH:$HOME/bin:$GOROOT/bin:$GOPATH/bin
保存,然后: source /root/.bash_profile
创建 github的codis目录 (目录不能为别的命名路径)
mkdir -p $GOPATH/src/github.com/CodisLabs/
cd $GOPATH/src/github.com/CodisLabs/
#安装git
yum install git -y
git clone https://github.com/CodisLabs/codis.git -b release3.2
...
cd codis
make
make gotest
...
配置 dashboard.toml (codis/config/下),这里只zookeeper的配置
coordinator_name = "zookeeper"
coordinator_addr = "192.168.140.131:2181,192.168.140.131:2182,192.168.140.131:2183"
#coordinator_auth = ""

# Set Codis Product Name/Auth.
product_name = "codis-demo"
product_auth = ""

# Set bind address for admin(rpc), tcp only.
admin_addr = "0.0.0.0:18080"
配置 proxy.toml (codis/config/下) ,zookeeper配置 jodis_compatible 置true
product_name = "codis-demo"
product_auth = ""
...
admin_addr = "0.0.0.0:11080"
...
proto_type = "tcp4"
proxy_addr = "0.0.0.0:19000"
...
jodis_name = "zookeeper"
jodis_addr = "192.168.140.131:2181,192.168.140.131:2182,192.168.140.131:2183"
jodis_auth = ""
jodis_timeout = "20s"
jodis_compatible = true
redis配置: (codis/config/redis.conf)
bind 192.168.140.131 127.0.0.1
protected-mode no # 这里我改为 no
port 6379
...
daemonize yes
pidfile "/tmp/redis_6379.pid"
logfile "/var/log/redis/6379.log"
dbfilename "dump6379.rdb"
dir "/usr/local/go/work/src/github.com/CodisLabs/codis/config"
拷贝一个 redis6378.conf 文件,进行相应的调整;
启动dashboard
bin/codis-dashboard --ncpu=4 --config=/usr/local/codis/src/github.com/CodisLabs/codis/config/dashboard.toml --log=dashboard.log --log-level=WARN &创建codis.conf配置json文件
bin/codis-admin --dashboard-list --zookeeper=192.168.140.131:2181,192.168.140.131:2182,192.168.140.131:2183 | tee codis.json启动fe web管理界面
bin/codis-fe --ncpu=4 --log=fe.log --log-level=WARN --dashboard-list=codis.json --listen=0.0.0.0:18090 &启动 codis-ha
bin/codis-ha --log=ha.log --log-level=WARN --dashboard=192.168.140.131:18080&启动 codis-proxy
bin/codis-proxy --ncpu=4 --config=/usr/local/codis/src/github.com/CodisLabs/codis/config/proxy.toml --log=proxy.log --log-level=WARN &启动 Codis-server
bin/codis-server config/redis.conf
bin/codis-server config/redis6378.conf
打开 fe web 管理界面: http://192.168.140.131:18090
1. 首先添加 proxy:
192.168.140.131:11080
2. 添加组及实例
在 Group 输入 1 => New Group
Add Server 添加 两个 Redis (6379, 6379) 两个实例; 后面 Group 添上面的 1; DataCenter 不管;
注意: 比如 第一个是 6379 可以正常添加,默认为 master;
第二添加也是为 Master ,如果不快速操作 “绿色把手” 按钮,会出现异常,然后自删除;因为要快速点击;
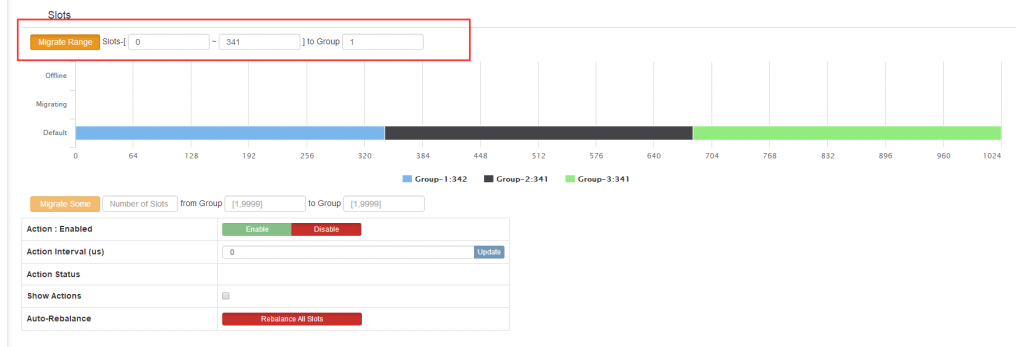
3. 分配slot 因为只有一个组,所以这个组分配 1024 个slot;
